Mastering the NIFT Situation Test: An Expert Guide to Material Manipulation
The NIFT Situation Test is the final hurdle for Bachelor of Design (B.Des) aspirants after clearing the written examination. This practical test evaluates a student’s creative ability to handle materials in response to a specific set of prompts. The core of this exam isn’t just building a model; it is about innovative material manipulation. To achieve top scores, students must transform mundane objects like wire, paper, and cloth into meaningful 3D representations. In this comprehensive guide, we will explore advanced techniques, structural strategies, and aesthetic principles to help you excel. For those looking to sharpen their skills, practicing with professional mock tests on myentrance.in is the best way to simulate the high-pressure environment of the actual exam.
Table of Contents
Core Principles of 3D Modeling
Before diving into specific materials, it is vital to understand what the jurors are looking for. The NIFT Situation Test is an assessment of your observation skills, visualization, and creative expression. You are given a limited set of materials and a limited time (usually 3 hours) to create a model that solves a problem or reflects a theme.
- Spatial Awareness: Your model should occupy space effectively. It should be balanced from all angles, not just the front.
- Structural Integrity: The model must be sturdy. If it collapses when the juror touches it, your score will plummet regardless of how beautiful it looks.
- Innovation: Avoid literal interpretations. If asked to make a ‘park’, don’t just make a bench; create an ‘experience of relaxation’.
💡 Click to Reveal: The Secret of Abstract Thinking
Jurors love models that use abstraction. Instead of making a realistic bird, use geometric shapes to imply movement and flight. This shows a higher level of design thinking.
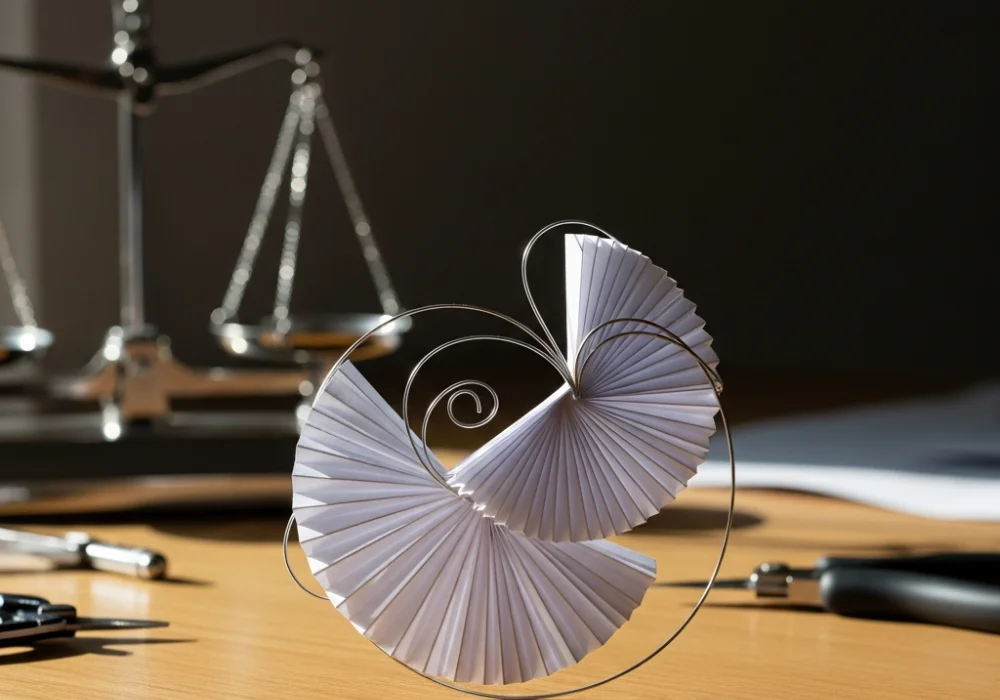
Advanced Paper Manipulation Techniques
Paper is the most common material provided, yet many students fail to use its full potential. Beyond simple folding, you can manipulate paper to create textures, volume, and strength.
1. Scoring and Folding
Scoring involves lightly running a cutter or a compass point over the paper without cutting through. This allows for crisp, clean folds. You can use scoring to create complex geometric patterns like accordions or radial fans.
2. Quilling and Curling
By rolling thin strips of paper, you can create intricate decorative elements. This adds a level of detail that signals patience and craftsmanship to the examiners. Curling paper over a pencil or scale can create organic shapes like waves or vines.
3. Pleating and Crumpling
Pleating creates rigid structures out of soft paper, while controlled crumpling can mimic natural textures like stone or bark. Combining these two techniques allows for a contrast between man-made and natural aesthetics.
4. Layering and Tesselation
Stacking layers of paper with small spacers (like bits of cardboard) creates a 3D depth effect. Tesselation, or repeating the same shape to cover a surface, provides a sophisticated architectural look.
Working with Wire and Metal Elements
Wire is often used for structural support, but it can also be a powerful visual tool. Mastering wire manipulation allows you to add ‘line’ to your 3D ‘mass’.
- Coiling: Wrapping wire tightly around a cylindrical object creates springs or textures that add dynamic movement to your model.
- Braiding: Braid three or more wires together to create a thicker, stronger column or rope effect.
- Weaving: Create a mesh by crossing wires over and under each other. This is excellent for representing screens, fences, or fabric textures.
Remember, wire can be difficult to bond. Use small incisions in your base material to ‘anchor’ the wire, or use thread to tie joints together discreetly. High-quality mock tests on myentrance.in often include prompts that force you to balance wire-work with heavier materials like clay or mount board.
Material Comparison Table
Different materials serve different purposes. Use this table to decide which technique to apply based on the items provided in your kit.
| Material | Best Technique | Visual Impact |
|---|---|---|
| Mount Board | Butt-Jointing / Scoring | Solid, Architectural |
| Aluminum Wire | Coiling / Spiraling | Fluid, Kinetic |
| Handmade Paper | Tearing / Layering | Rustic, Organic |
| Fabric / Thread | Gathering / Weaving | Soft, Textured |
| Corrugated Sheet | Peeling / Slitting | Industrial, Linear |
Understanding the Evaluation Criteria
NIFT examiners use a standardized rubric to score your model. Knowing these criteria allows you to prioritize your efforts during the exam.
- Creative Handling of Material (20%): How many different ways did you use the materials? Did you transform the material or use it as is?
- Neatness and Finish (20%): Are there glue marks visible? Are the cuts straight? A messy model suggests a lack of precision.
- Conceptualization (30%): Does the model actually represent the theme given? Is the idea original?
- Write-Up (30%): Your ability to explain your design journey is just as important as the model itself.
💡 Pro-Tip: Zero Waste Policy
Try to use as much of the provided material as possible. While you shouldn’t clutter your model, showing that you can utilize scrap materials creatively is a huge plus.
Crafting the Perfect Write-Up
Many students spend 2 hours and 50 minutes on the model and only 10 minutes on the write-up. This is a mistake. Your write-up should justify your design choices and connect the model to the theme. It should be concise, professional, and insightful.
- State the Concept: Clearly define your theme and why you chose it.
- Explain Material Choice: Why did you use wire for the ‘sun’? (e.g., “I used gold-toned wire to represent the radiating energy of the morning sun.”)
- Describe Techniques: Briefly mention that you used ‘quilling’ or ‘tesselation’ to show your technical knowledge.
- Conclusion: Summarize how your model solves the design problem.
Practice your writing skills alongside your model making. Using the sample papers on myentrance.in, practice writing descriptions for every model you build at home.
Frequently Asked Questions (FAQs)
Can I use colors or materials from outside?
No. You are strictly prohibited from using any material not provided in the kit. Bringing outside stationery like cutters or scales is allowed, but no decorative materials.
What happens if my model falls over?
Stability is key. If a model is unstable, it shows poor structural planning. Always build a strong base before working on the vertical elements.
How do I manage time during the test?
Spend 15 minutes planning, 2 hours building, 30 minutes finishing/cleaning, and 15 minutes on the write-up. Stick to this schedule strictly.
Quick Knowledge Check
Test your understanding of the NIFT Situation Test requirements!
1. Which technique is best for creating a crisp, geometric fold in mount board?
💡 Click to Reveal Answer
Scoring. By lightly cutting the top layer of the board, you can fold it without the edges cracking or becoming uneven.
2. What percentage of the final score is generally attributed to the ‘Write-Up’?
💡 Click to Reveal Answer
Approximately 20% to 30%, depending on the specific evaluation rubric for that session. It is a critical component of the total score.
3. Is it better to make a realistic model or an abstract one?
💡 Click to Reveal Answer
Abstract or stylized models usually score higher as they demonstrate a deeper level of design thinking and conceptual visualization compared to literal copies.
Ready to Ace Your NIFT Exam?
Don’t leave your design career to chance. Get access to the latest pattern mock tests, material handling tutorials, and expert feedback at myentrance.in. Join thousands of successful students today!
💬 Chat with our Experts on WhatsApp (+91 9526806124)