Introduction to NID DAT Studio Test Material Manipulation
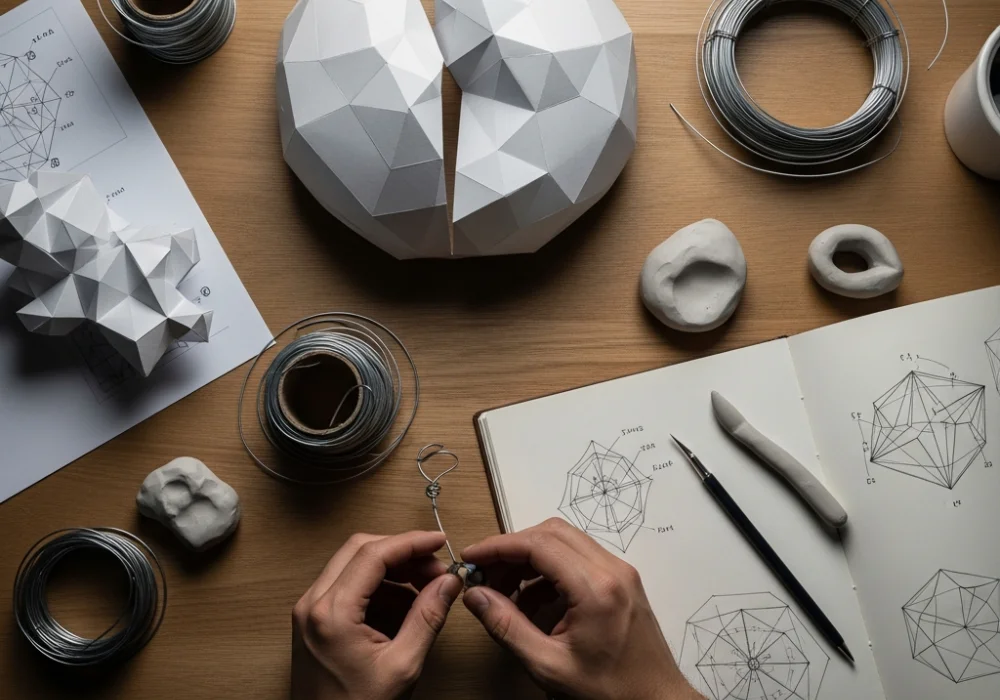
The National Institute of Design (NID) Design Aptitude Test (DAT) Studio Test is the final hurdle for aspiring designers. Unlike the prelims, which test your theoretical and sketching skills, the Studio Test evaluates your hands-on ability to transform raw materials into meaningful 3D forms. Material manipulation is the core competency required here. It involves the skillful application of physical techniques to change the state, shape, and structure of materials like paper, wire, clay, and cloth. At myentrance.in, we specialize in providing mock tests and resources that simulate these exact challenges, helping you develop the tactile intelligence necessary for success.
Understanding Core Material Concepts
Before diving into specific techniques, one must understand the ‘Nature of Materials’. Every material provided in the NID DAT Studio Test has unique physical properties—some are flexible, some rigid, some elastic, and some brittle. Your goal as a designer is to respect these properties while pushing their limits to create a functional or aesthetic model. In the latest pattern of the exam, jurors look for how intelligently you use the material’s inherent strengths. For instance, using the rigidity of cardstock for structural support while using the flexibility of tissue paper for texturing shows a high level of design thinking.
💡 Pro-Tip: The ‘Material Logic’ Approach
Always ask: “Why am I using this material for this part of the model?” If the answer is just “because it was there,” rethink your strategy. Match the material to the function—wire for skeletons, paper for skins, and clay for weight or organic curves.
Advanced Paper Manipulation Techniques
Paper is the most common material in the Studio Test due to its versatility. Mastering it goes beyond simple folding. Here are the professional techniques taught in our latest pattern mock tests at myentrance.in:
- Scoring: This involves making a shallow cut on the surface of the paper without cutting through. Scoring allows for perfectly crisp, professional folds. Use a dry refill or the back of a cutter.
- Curling: By drawing the paper over a sharp edge (like a ruler or scissors), you can create consistent curves and spirals, perfect for organic forms.
- Pleating and Crimping: Folding paper back and forth to create an accordion effect. This increases the structural strength of a thin sheet, allowing it to support weight.
- Kirigami: Unlike Origami, Kirigami involves both cutting and folding. This technique is excellent for creating 3D pop-up structures from a single flat sheet.
- Slotting: Instead of using adhesive, create slots in two pieces of paper to interlock them. This demonstrates a high level of joinery skill.
Wire Sculpting and Structural Integrity
Wire represents ‘line’ in three dimensions. In the NID DAT Studio Test, you might be given GI wire or copper wire. The challenge lies in making a 2D line occupy 3D space. Key techniques include:
- Lashing and Binding: Using thinner wire or thread to join two thicker wires together. Avoid messy knots; instead, use neat coils.
- Zig-zagging: Creating a series of sharp bends to add springiness or texture to a wire frame.
- Coiling: Wrapping wire tightly around a cylindrical object (like a pencil) to create a spring. This adds volume without adding much weight.
- Contour Drawing in 3D: Visualizing the outline of an object and recreating it using a single continuous piece of wire.
💡 Pro-Tip: Tension and Compression
When building a bridge or a tower with wire, use triangles. Triangular structures distribute weight evenly through tension and compression, making your model significantly more stable than a square-based one.
Clay and Malleable Material Handling
Clay or plasticine is often used to test your understanding of volume and mass. Techniques to focus on include:
- Surface Texturing: Using tools (or everyday objects like combs and coins) to create realistic textures like skin, fabric, or stone on the clay surface.
- Hollowing: Reducing the weight of a large clay model by hollowing out the center, which prevents collapsing under its own mass.
- Additive vs. Subtractive: Additive involves building up a form bit by bit. Subtractive involves starting with a block and carving away. Knowing when to use which is vital for the current syllabus requirements.
- Smoothing: Achieving a professional finish using small amounts of water or oil, ensuring no fingerprints are left on the final model.
Material Manipulation Comparison
Choosing the right technique for the right material is essential. Use this table as a quick reference during your preparation.
| Material | Primary Strength | Best Technique | Common Pitfall |
|---|---|---|---|
| Paper/Cardboard | Planar Surfaces | Scoring & Folding | Over-gluing/Messy joins |
| Metal Wire | Linearity & Skeletal | Coiling & Lashing | Sharp edges/Instability |
| Modeling Clay | Volume & Texture | Subtractive Carving | Visible fingerprints |
| Fabric/Cloth | Fluidity & Drape | Pleating & Knotting | Fraying edges |
Golden Rules for the Studio Test Success
Preparation for upcoming exams requires more than just knowing techniques; it requires a mindset. Here are the golden rules followed by top rankers who used myentrance.in resources:
- Cleanliness is Next to Design-ness: Keep your workspace clean. Adhesive marks, pencil smudges, or scraps of material left on your model can lead to negative marking.
- Time Management: Spend the first 10 minutes planning and sketching. Spend the last 10 minutes on finishing touches. The bulk of your time should be for construction.
- Stability: Your model must stand on its own. If it wobbles or requires manual support, it shows poor structural understanding.
- Innovation: Don’t just make a literal representation. If asked to make a ‘chair’, think about the ‘concept’ of sitting. Is it for a bird? A king? An alien?
Frequently Asked Questions (FAQs)
What tools are provided in the NID DAT Studio Test?
Usually, you are provided with basic tools like a cutter, scissors, ruler, and adhesives (glue stick or Fevicol). However, the material list changes every year based on the current syllabus. It is best to practice with a wide variety of materials.
Can I bring my own materials to the Studio Test?
No. You are strictly required to use only the materials provided by the NID center. Bringing outside materials can lead to disqualification. You are usually only allowed to bring basic stationary like pencils and pens.
How important is the ‘write-up’ in the Studio Test?
Extremely important! Your write-up explains your design logic. Even if your model isn’t perfect, a strong write-up that explains your ‘Material Manipulation’ choices can save your score.
Quick Knowledge Check
Test your understanding of material manipulation techniques with these three questions:
1. Which technique is used to create a sharp, clean fold in thick cardstock?
Reveal Answer
Scoring. By lightly cutting the surface fibers, you direct the fold precisely along that line.
2. Why are triangles preferred over squares for building wire structures?
Reveal Answer
Structural Stability. Triangles are geometrically rigid and do not deform under pressure, unlike squares which can collapse into parallelograms.
3. What is ‘Kirigami’ in the context of paper design?
Reveal Answer
Cutting and Folding. Unlike Origami (which is fold-only), Kirigami involves strategic cuts to create 3D forms from a single sheet.
Ready to Ace Your Studio Test?
Don’t leave your design career to chance. Get access to the latest pattern mock tests, material handling tutorials, and expert feedback at myentrance.in.
💬 Chat with our Experts on WhatsApp (+91 9526806124)