Introduction: The Philosophy of the Situation Test
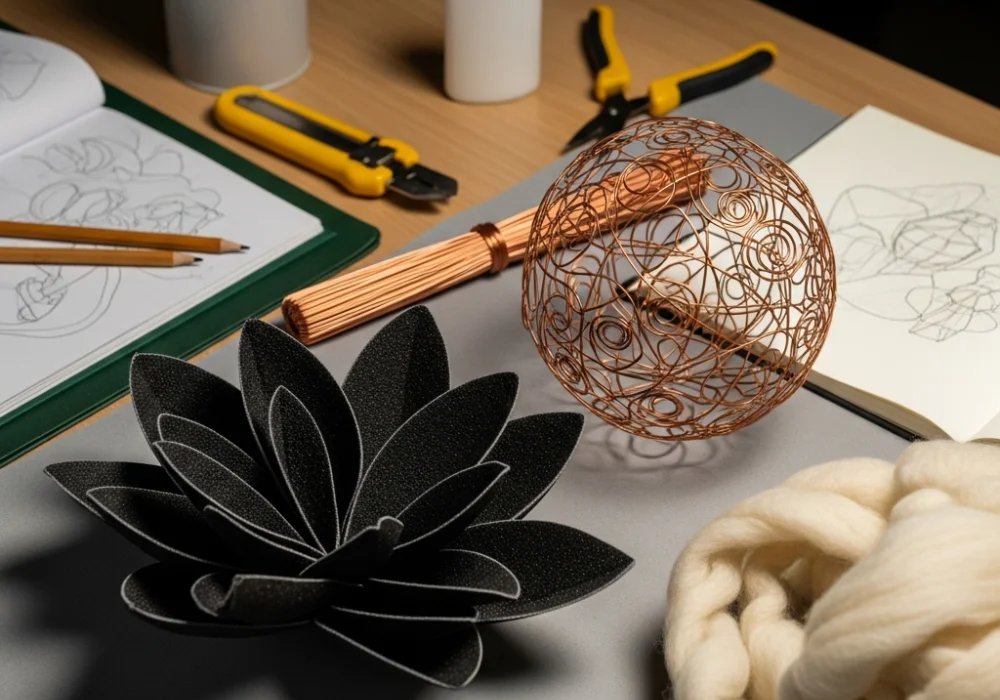
Welcome, future designers, to a deep dive into one of the most challenging aspects of the NIFT admission process: the Situation Test. As a panelist who has observed thousands of students, I can tell you that we are not just looking for a ‘pretty model.’ We are looking for a designer’s mind at work. In this masterclass, we will tackle a specific, high-level scenario: Creating a symbolic memento for a retiring gardener, utilizing a restricted but versatile material palette of sandpaper, wool, and wire.
A gardener’s life is a journey of patience, growth, and touch. To honor this, your model must move beyond literal representations (like a simple shovel) and venture into the realm of organic symbolism and tactile storytelling. This guide will teach you how to manipulate textures to evoke emotion and demonstrate technical prowess.
💡 Pro-Tip: The Panelist’s Secret Perspective
We value the ‘process’ over the final product. If your model has a brilliant concept but slightly messy edges, it often scores higher than a perfect model with no soul. Your goal is to show us how you think through materials.
Phase 1: Decoding the Evaluation Criteria
Before you touch the materials, you must understand how your work is graded. In the latest NIFT evaluation cycles, we look for five core pillars:
- Concept Innovation: Did you make a plant, or did you make a representation of ‘Time’ and ‘Growth’? The latter wins.
- Material Manipulation: How did you change the inherent properties of the sandpaper or wool? Did you just glue them, or did you transform them?
- Structural Integrity: Does the memento stand on its own? Is it fragile or robust?
- Aesthetic Appeal: Use of color (within given materials), proportion, and balance.
- The Write-up: Your ability to articulate your design journey in 100 words is 20% of your total score.
“Design is not just what it looks like and feels like. Design is how it works and how it speaks.” – A Panelist’s Motto
Phase 2: Material Deep Dive & Texture Manipulation
1. Sandpaper: Representing the Earth and Hard Work
Sandpaper is often misused. Most students use it as a flat base. To stand out, use its grit and rigidity. It represents the gardener’s calloused hands and the raw earth. You can score the back of sandpaper to curve it, or crumble it to create a ‘soil’ texture. Technique: Try ‘quilling’ thin strips of sandpaper to create the look of weathered bark.
2. Wool: The Essence of Growth and Softness
Wool provides the ‘Organic’ element. It represents the softness of petals, the flow of water, or the entanglement of roots. Technique: Instead of just laying wool flat, try braiding it with wire for structural vines, or ‘needle-felting’ it by hand to create dense, 3D spherical forms (buds).
3. Wire: The Skeletal Foundation
Wire is your best friend for ‘Organic Forms’. It provides the skeleton. Use it to create dynamic curves that mimic the growth of a sapling. Technique: Twist multiple strands of wire to create a ‘trunk’ and branch them out into finer ‘capillaries’ at the tips.
💡 Texture Hack: Sandpaper vs. Wool
Contrast is king. Place the softest wool directly against the roughest sandpaper. This juxtaposition highlights the ‘delicacy of nature’ vs. the ‘harshness of the environment’, a classic design narrative.
Phase 3: Step-by-Step Model Construction Strategy
Step 1: Ideation (The First 15 Minutes)
Don’t start building immediately. Sketch three thumbnails. For a retiring gardener, let’s settle on the concept of ‘The Eternal Season’—a memento shaped like an abstract hand holding a blooming seed. The hand represents the gardener, and the seed represents the legacy left behind.
Step 2: The Wire Skeleton (Minutes 15-45)
Construct a wire frame that mimics the gesture of a cupped palm. Ensure the base is wide enough for stability. Use a ‘tripod’ structure hidden within the form to prevent it from toppling. This wire armature should look like a piece of art even before it’s covered.
Step 3: Texturing with Sandpaper (Minutes 45-90)
Cut sandpaper into organic, leaf-like shapes. Instead of keeping them flat, use a pencil to ‘curl’ the edges. Glue these to the wire hand, overlapping them like scales or bark. This creates a weathered, ‘hand-of-the-earth’ aesthetic. Ensure no glue marks are visible—use the grit of the sandpaper to hide joints.
Step 4: Incorporating the Wool (Minutes 90-120)
Inside the ‘cupped hand’ of sandpaper and wire, introduce the wool. Use a vibrant color (if provided) to represent the ‘heart’ of the garden. Loop the wool through the wire gaps to create a soft, cloud-like center. This represents the life the gardener nurtured.
Step 5: The Final Refinement (The Last 30 Minutes)
Clean up any stray glue strands. Ensure the model is balanced. Add small wire ‘tendrils’ that sprout from the wool, tipped with tiny beads of sandpaper to tie the materials together. This creates a cohesive Material Synergy.
Phase 4: Writing the Design Concept
Your write-up should be professional and evocative. Here is a sample structure for this specific model:
“Title: The Eternal Root. My memento symbolizes the transition of a gardener from a laborer to a legacy. I manipulated wire to create a spiraling organic form representing growth. The sandpaper was scored and curled to represent the ruggedness of the earth and the gardener’s hands, while the wool was felted to provide a core of softness, symbolizing the life and beauty nurtured over a lifetime. The contrast between the abrasive sandpaper and the soft wool creates a tactile narrative of the gardener’s journey.”
💡 Quiz: What’s the most common mistake?
Answer: Using too much tape or glue. In the NIFT Situation Test, the ‘neatness’ of your joinery is a sign of a skilled craftsman. Always try to find mechanical ways to join materials (like wrapping wire) before reaching for the glue gun.
Conclusion: Final Checklist for Success
As you prepare for your upcoming test, remember these final points to ensure you are in the top 1% of candidates:
- Manage your time: 2 hours fly by. Spend exactly 20% on planning, 70% on building, and 10% on the write-up and cleaning.
- Cleanliness: Your workspace reflects your mind. A messy desk often leads to a messy model. Keep your scraps in a corner.
- Narrative: Every fold in the sandpaper must have a reason. If a panelist asks ‘Why is this here?’, you should have a design-based answer ready.
Stay creative, stay focused, and let your materials tell the story of the gardener’s heart.
Need personalized feedback on your mock models?
💬 Chat with our Experts on WhatsApp (+91 9526806124)