Introduction: The Gravity of the Situation Test
Welcome, future designers. As an elite panelist who has evaluated thousands of models at the NIFT campuses, I can tell you that the Situation Test is not merely a test of your handicraft skills; it is a test of your conceptual depth, material intelligence, and ability to communicate complex narratives through three-dimensional forms. Today, we are diving deep into a challenging yet rewarding brief: ‘The Frozen Pulse’.
This scenario asks you to design a fashion ramp inspired by melting Arctic glaciers. This isn’t just about making a ‘pretty’ stage. You are tasked with highlighting the stark contrast between rigid, ancient ice structures and the fluid, chaotic movement of flowing water. This is a climate-awareness collection, meaning your design must evoke emotion and urgency. In this masterclass, we will break down how to conquer this challenge from ideation to the final written justification.
1. What the Examiners Are Secretly Looking For
Before you touch your scissors, you must understand our evaluation scorecard. We look for five key pillars in a high-scoring model:
- Conceptual Innovation: Did you just build a flat ramp with some blue paper? Or did you create a multi-level experience that tells a story of ecological decay?
- Material Manipulation: Can you make a rigid piece of cardboard look like a jagged ice floe? Can you make a piece of wire look like a flowing stream? We look for transformation.
- Structural Stability: Your model must be neat and sturdy. A ‘melting’ ramp should look intentional, not like it’s actually collapsing due to poor glue work.
- Aesthetic Appeal: The balance of negative and positive space. The ‘Frozen Pulse’ requires a balance between the heavy ‘frozen’ elements and the light ‘pulse’ elements.
- The Write-up: Your ability to explain your design choices using professional design vocabulary (e.g., rhythm, contrast, metamorphosis).
💡 Click to Reveal: The ‘Golden Rule’ of NIFT Models
The ‘Rule of Thirds’ and ‘Dynamic Movement’. Never make a symmetrical model unless the prompt specifically asks for it. For ‘The Frozen Pulse’, a diagonal or spiral ramp creates more tension and interest than a straight one, symbolizing the unpredictable nature of climate change.
2. Material Handling Hacks for ‘The Frozen Pulse’
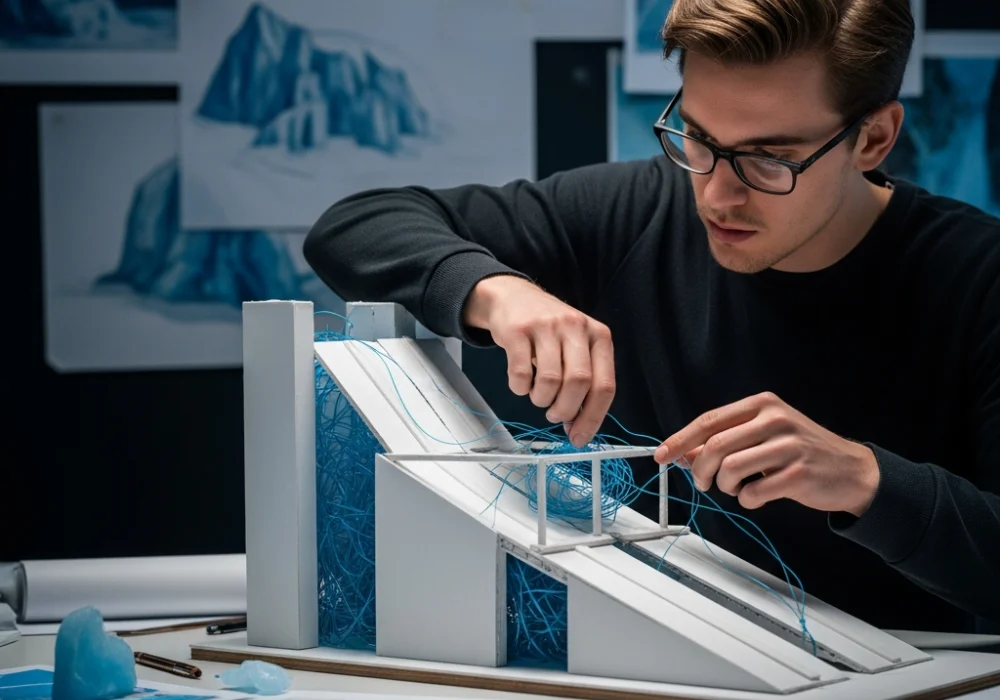
In the latest NIFT kits, you are often given a mix of cardboard, ivory sheets, translucent paper, wire, thread, and perhaps some clay or foil. Here is how to use them for this specific theme:
Representing Rigid Ice:
- Cardboard Scoring: Take your mount board or thick cardboard. Use your cutter to lightly score the surface without cutting through. Bend it in sharp, geometric angles to create ‘jagged peaks’.
- Ivory Sheet Layering: Crumple white ivory sheets and then partially smoothen them out. This creates a texture reminiscent of cracked glacial surfaces.
- White Clay: Use small amounts of clay at the base of your ‘ice’ structures to provide weight and simulate snow-drifts.
Representing Flowing Water:
- Wire and Thread: Twist blue or silver wire into organic, wavy shapes. Wrap blue thread around the wire to give it ‘volume’ and a sense of ‘current’.
- Translucent Sheets: If provided with OHP sheets or tracing paper, use them to create the ‘melting’ effect. Roll them into cylinders or waves to catch the light, mimicking the transparency of water.
- Aluminium Foil: Crinkle foil into thin ‘veins’ that run between the ice structures to represent the ‘pulse’ or the trickling of melted water.
3. Step-by-Step Model Construction Strategy
Time management is the difference between a NIFT seat and a missed opportunity. You have 3 hours. Divide them as follows:
Phase 1: Ideation & Sketching (15 Minutes)
Do not skip this. Draw a rough 3D perspective of your ramp. Decide where the models will walk. For ‘The Frozen Pulse’, imagine a ramp that starts high (the glacier) and descends into a fluid, winding path (the meltwater). Sketch the ‘nodes’ where the rigid ice meets the flowing water.
Phase 2: Building the Base (30 Minutes)
Your base must be rock solid. Use the thickest cardboard provided. To represent the Arctic, consider a circular or irregular base rather than a square one. This makes the model feel like an ‘island’ in the ocean.
Phase 3: Creating the ‘Rigid’ Skeleton (60 Minutes)
Construct the high points of the ramp. Use ‘Accordion Folding’ to create heights. These represent the glaciers. Ensure these are stark white or grey. Use sharp edges to denote ‘rigidity’.
Phase 4: Injecting the ‘Pulse’ (45 Minutes)
Now, weave in the fluidity. Connect your high peaks with ‘waterways’ made of wire, thread, or translucent paper. These are your walking paths for the models. The contrast is key: where the ice is sharp, the water paths must be curvy and smooth.
Phase 5: Refinement & Neatness (30 Minutes)
Hide your glue marks! Use ‘paper tabs’ instead of just globbing glue. Ensure there are no stray thread ends. A clean model is a professional model.
“Design is not just what it looks like and feels like. Design is how it works—especially under the pressure of a ticking clock.”
4. The Written Justification (The Narrative)
Many students forget that the write-up carries significant weight. Your write-up for ‘The Frozen Pulse’ should use the Problem-Solution-Impact framework.
Sample Write-up Snippet:
“My design, ‘The Frozen Pulse’, serves as a visual metaphor for the current Arctic crisis. I utilized geometric cardboard scoring to represent the ‘Rigid Ice’—symbolizing the ancient stability of our planet. In contrast, I manipulated blue wire and translucent sheets to create a winding, organic ramp path that represents the ‘Flowing Pulse’ of meltwater. This juxtaposition highlights the fragility of our environment. The ramp’s descent from high, sharp peaks to a low-lying fluid base mirrors the literal decline of the glaciers, urging the audience to recognize the ‘pulse’ of a planet in transition.”
💡 Quiz: Which Design Principle is most relevant here?
Answer: Contrast. While balance and rhythm are important, the brief specifically asks for the contrast between ‘rigid’ and ‘flowing’. If your model is all rigid or all flowing, you lose marks on brief adherence.
5. Expert Tips for the D-Day
- Don’t waste materials: Plan your cuts. If you run out of white paper for ‘ice’, you can’t get more.
- Focus on Scale: Remember this is a fashion ramp. Imagine tiny 2-inch models walking on it. Is the path wide enough? Is the scale consistent?
- Stability Check: Blow on your model gently. If it wobbles, it needs more support. Panelists hate ‘flimsy’ designs.
- The 360-Degree View: The panelist will walk around the table. Ensure your model looks good from the back and sides, not just the front.
Common Pitfalls to Avoid
Avoid literalism. Don’t try to draw a penguin or a polar bear on the ice. This is a Fashion Ramp design, not a school geography project. Focus on abstracting the textures and forms of the Arctic rather than making a literal diorama.
Ready to Ace Your NIFT Situation Test?
Preparation is the key to confidence. If you found this guide helpful, imagine what our personalized mock tests and 1-on-1 feedback sessions can do for your rank!
💬 Chat with our Experts on WhatsApp (+91 9526806124)