Introduction to NID Material Handling
The National Institute of Design (NID) Design Aptitude Test (DAT) Mains, commonly known as the Studio Test, is a critical phase in the journey of every aspiring designer. While the Prelims test your observation and visualization on paper, the Studio Test assesses your ability to translate ideas into three-dimensional forms. Material handling is the core of this evaluation. It is not just about making something beautiful; it is about demonstrating your understanding of structural integrity, aesthetic balance, and material properties under time pressure.
To excel in the latest pattern of the NID Studio Test, you must move beyond simple crafting and think like a designer. This guide provides a deep dive into the materials you will likely encounter and practical strategies to handle them effectively. For those looking to sharpen their skills, practicing with high-quality mock tests from myentrance.in can provide the competitive edge needed for upcoming exams.
The Core Objectives of Material Handling
In the Studio Test, the jury looks for specific traits in your 3D models. Understanding these will help you prioritize your efforts during the exam:
- Creative Problem Solving: How uniquely have you addressed the given problem?
- Material Sensitivity: Do you understand the strengths and weaknesses of the material provided (e.g., can you make paper look heavy or wire look fluid)?
- Joinery and Neatness: Are the joints clean? Does the model stand without excessive glue or tape?
- Functionality and Proportion: Does the model represent the intended object or concept in the correct scale?
Essential Materials and How to Master Them
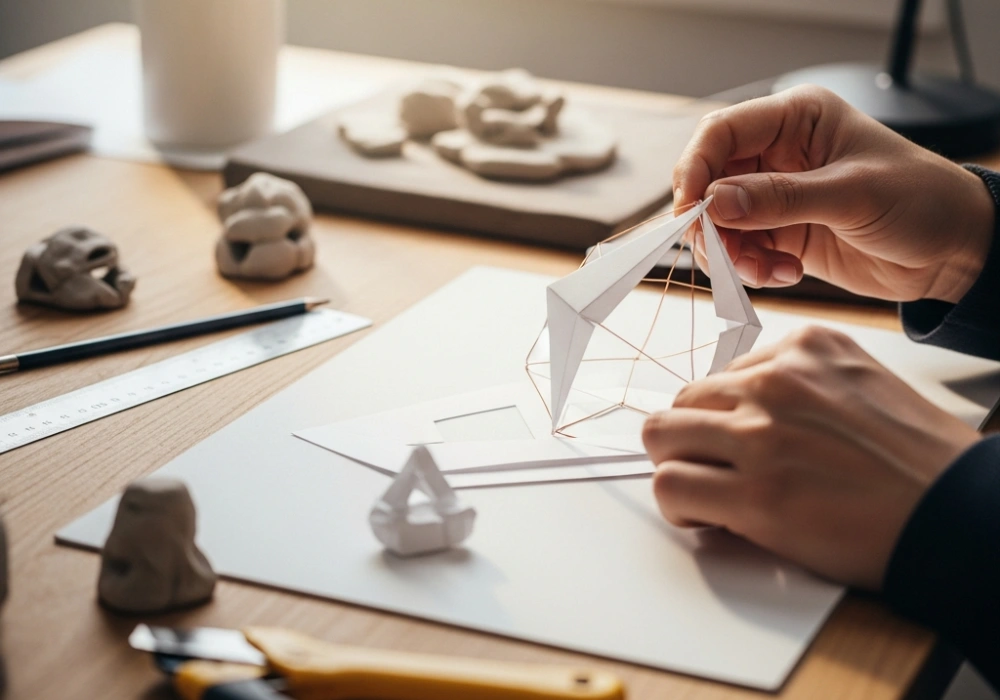
1. Paper and Cardboard
Paper is the most common material used in NID tests due to its versatility. You may be given cartridge paper, ivory sheets, or corrugated cardboard.
- Scoring: To get crisp folds, always score the paper lightly with a cutter or a spent ballpoint pen. Never fold thick paper blindly, as it will crack and look untidy.
- Curving: To create organic curves, pull the paper over the edge of a table or use a cylindrical object like a pencil to break the fibers gradually.
- Structural Rigidity: Use techniques like pleating, rolling into tubes, or creating triangulated structures to make flimsy paper support weight.
2. Clay and Plasticine
Clay tests your ability to handle mass and volume. It requires a different mindset than paper because it is additive and subtractive.
- Conditioning: Knead the clay thoroughly to remove air bubbles and make it pliable.
- Surface Finish: Use a little water to smooth out fingerprints, but avoid over-wetting, as it makes the clay messy and weak.
- Balance: Ensure your clay model is structurally balanced so it doesn’t slump under its own weight.
3. Wire and String
Wire is used to explore line and skeleton. It is excellent for representing motion or transparency.
- Bending: Use your hands for large curves and pliers (if provided) for sharp angles. Constant bending at the same spot will cause the wire to snap.
- Tension: When using string, maintain consistent tension. Loose strings make a model look unfinished and weak.
Comparing Common Materials in NID Studio Tests
Below is a comparison table to help you understand which material to choose based on the desired outcome during your practice sessions.
| Material | Primary Property | Best Used For | Common Challenges |
|---|---|---|---|
| Cartridge Paper | Flexible & Light | Architectural forms, abstract shapes | Tearing, lack of structural strength |
| Wire (GI/Copper) | Linear & Malleable | Skeletal structures, contours, motion | Difficult to join without tape/soldering |
| Clay/Plasticine | Plastic & Heavy | Organic forms, figurines, mass studies | Fingerprints, collapsing under weight |
| Mount Board | Rigid & Strong | Load-bearing models, geometric bases | Hard to cut, requires precise scoring |
| Wool/Thread | Flexible & Tensile | Tension structures, textures, weaving | Tangling, difficult to secure |
Pro-Tips for the NID Studio Test Day
Master the ‘Less is More’ Rule
Students often over-complicate their designs, leading to unfinished models. Focus on one strong concept and execute it perfectly. A simple, well-finished paper bird is better than a complex, messy dragon made of multiple materials. Practice these constraints using the mock materials and timed sessions available on myentrance.in.
Manage Your Time Wisely
The Studio Test is usually 2 to 3 hours long. Divide your time using the 15-70-15 rule:
- First 15 Minutes: Brainstorming and sketching 3-4 quick thumbnails. Do not start building immediately!
- Middle 70 Minutes: Focused construction. Build the main structure first, then add details.
- Last 15 Minutes: Cleaning up joints, removing excess glue marks, and ensuring the model stands firmly on its base.
Keep Your Workspace Clean
The examiners observe your process. A messy desk with scraps everywhere indicates a disorganized mind. Keep your scraps in a corner and ensure your final presentation area is spotless.
Conclusion
Success in the NID Material Handling round comes from a blend of technical skill and creative intuition. By understanding the inherent properties of materials like paper, clay, and wire, you can transform simple objects into compelling design solutions. Remember, the goal is to show the jury how you think through your hands. Start your preparation early, experiment with different textures at home, and utilize the expert-curated mock tests at myentrance.in to stay ahead of the competition for the upcoming entrance exams.
Frequently Asked Questions (FAQ)
What tools should I carry for the NID Studio Test?
While NID usually provides basic tools like cutters, glue, and scissors, it is always wise to carry your own basic toolkit including a steel ruler, a sharp cutter, a pencil, and an eraser. Always check the official admit card instructions for the latest allowed items.
Is the use of adhesives restricted in the Material Handling round?
In most cases, you are provided with Fevicol, glue sticks, or tape. However, the best models are those that use clever joinery like slots, tabs, and interlocking mechanisms rather than relying solely on large amounts of glue.
How can I practice material handling at home?
You can practice by taking everyday objects and trying to replicate them using only one material (like an apple made of wire or a chair made of paper). Additionally, enrolling in online mock tests and workshops at myentrance.in can help you understand the standard of work expected.
What happens if my model falls apart during the test?
Don’t panic. If you have time, try to fix it using a different joinery method. If time is up, focus on explaining your concept and the intended structure during the interview or on the write-up sheet provided. The process is often as important as the final product.
