Master NID Sensory Storytelling Now?
Is your design portfolio missing the one thing NID examiners crave? The ability to translate a sound or a texture into a compelling narrative is no longer optional—it is the gatekeeper to your admission at the National Institute of Design.
🚀 Key Takeaways
- ✅ Sensory Integration: Learn to bridge the gap between abstract sounds and concrete visuals.
- ✅ The 6-Frame Logic: Master the pacing required for NID’s signature storyboard format.
- ✅ Tactile Translation: Techniques to draw “feelings” like roughness, heat, or stickiness.
- ✅ Auditory Pacing: Using visual metaphors to represent volume, frequency, and rhythm.
Table of Contents
Why is NID Obsessed with Sensory Storytelling?
NID focuses on sensory-driven storytelling to evaluate a candidate’s empathy and observational depth. By asking for storyboards based on auditory or tactile prompts, they test your ability to transcend literal drawing and tap into synesthesia—the cognitive cross-wiring where you can “see” a sound or “visualize” a touch.
In the competitive landscape of the NID DAT preparation, candidates who only focus on anatomy or perspective often fail. The real winners are those who can communicate the vibration of a distant drum or the grit of sandpaper through line weight and composition alone.
💡 Click to Reveal: The Examiner’s Secret Checklist
The examiner isn’t looking for a ‘pretty’ drawing. They are looking for: 1. Clarity of the sensory prompt, 2. Emotional resonance, 3. Logical sequence (Pacing), and 4. Creative metaphor usage.
Are You Missing the Rhythm in Auditory Prompts?
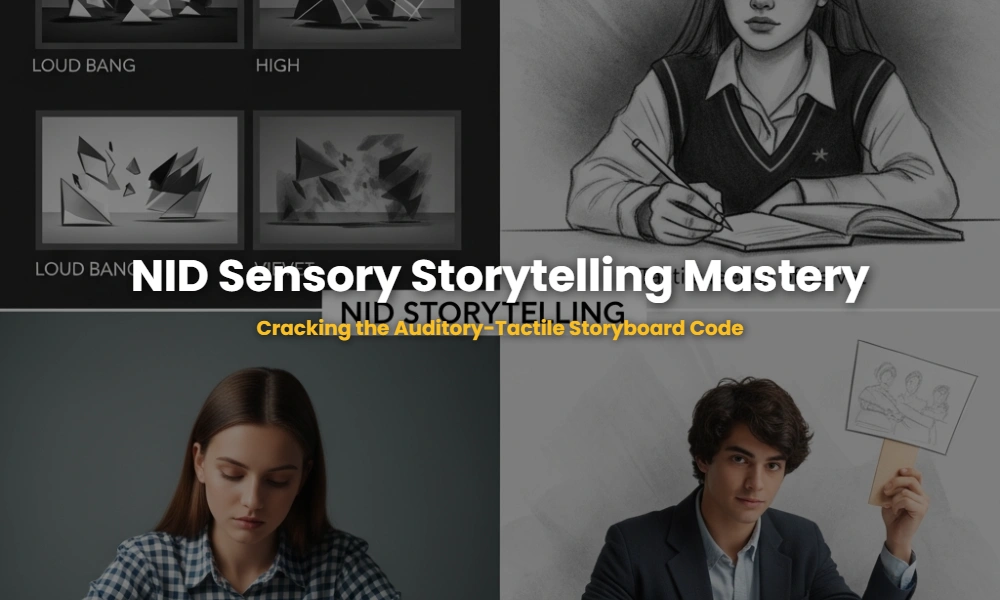
Auditory prompts in NID require you to visualize soundscapes—ranging from the repetitive ‘tick-tock’ of a clock to the chaotic ‘cacophony’ of a railway station. To succeed, you must translate sound characteristics like frequency, amplitude, and rhythm into visual elements like line density, contrast, and frame orientation.
When you encounter a prompt like “The sound of a glass breaking in a silent room,” your 6-frame storyboard shouldn’t just show a hand dropping a glass. It should emphasize the contrast between silence (empty white space) and the sudden sound (sharp, jagged lines and shattered compositions).
- Line Weight: Use thick, heavy lines for loud, low-frequency sounds.
- Composition: Fragmented layouts represent high-pitched, chaotic noises.
- Negative Space: Essential for representing silence or the ‘pause’ between sounds.
The Secret to Drawing ‘Feelings’ You Can’t Touch!
Tactile storytelling involves depicting textures and physical sensations—such as slime, heat, or velvet—without using words. This tests your understanding of materiality and how physical surfaces interact with light and human interaction within a narrative context.
To master this, think about reaction. If the prompt is “Walking on hot sand,” the focus shouldn’t just be on the sand, but on the exaggerated physical response: the lifting of a heel, the tension in the toes, and the shimmering heat haze (visualized through wavy lines). This creates a visceral connection with the viewer, making them ‘feel’ the prompt.
Internalize the design thinking principles to move from literal depiction to empathetic experience.
The ‘Perfect 6-Frame’ Formula for Maximum Impact
The six-frame storyboard is a test of your narrative pacing. You have exactly six windows to establish a setting, introduce the sensory prompt, build tension, reach a climax, and provide a resolution. Mismanaging these frames is the number one reason students fail the NID studio test or Mains exam.
- Frame 1: Establishing the Silence/Context. Set the baseline for the sense (e.g., a calm surface before the ‘ripple’).
- Frame 2: The Sensory Trigger. Introduce the sound or the touch. Make it subtle.
- Frame 3: The Reaction. How does the environment or the character respond to the sensation?
- Frame 4: The Escalation. Intensify the visual representation of the sense (thicker lines, more detail).
- Frame 5: The Climax. The peak of the sensory experience (e.g., the loudest moment or the sharpest pain).
- Frame 6: The Aftermath. The residual effect (e.g., an echo, a scar, or a lingering warmth).
Auditory vs. Tactile Storyboarding Strategies
| Feature | Auditory Focus | Tactile Focus |
|---|---|---|
| Primary Goal | Visualizing invisible waves & rhythm. | Visualizing physical surface & reaction. |
| Key Visual Tool | Onomatopoeia (visualized), Line Vibration. | Texture Rendering, Pressure Points. |
| Mistake to Avoid | Drawing the source only (e.g., just a bell). | Ignoring the person ‘feeling’ the object. |
Insider Examiner Tips: Don’t Get Ghosted!
Did you know that most NID examiners spend less than 30 seconds per storyboard? To grab their attention, your frames must have compositional flow. Use leading lines to guide the eye from Frame 1 to Frame 6. If the sound moves from left to right, your character’s movement or the line energy must follow that same vector.
Another pro-tip: Use visual metaphors. Instead of drawing a loud sound, draw a person’s hair blowing back as if hit by a physical gust of wind. This is “Show, Don’t Tell” at its finest.
❓ Quick Quiz: Which frame is the most important?
Frame 5 (The Climax). This is where the sensory prompt is at its most extreme. If this frame is weak, the entire storyboard loses its impact. Ensure it has the highest contrast and most dynamic composition.
Common Questions (FAQ)
A: Unless specified, most NID storyboarding prompts are best executed in monochrome or pencil. Focus on value (lights and darks) rather than color, as it shows better control over form and atmosphere.
A: Use visual cues like condensation (cold), shimmering air (heat), or physical reactions like shivering vs. sweating. The environment should ‘state’ the temperature even if the object doesn’t.
Struggling with Sensory Drawing?
Get personalized feedback on your storyboards and mock tests from NID alumni.
💬 Chat with our Experts on WhatsApp (+91 9526806124)