Introduction: The Soul of the Handloom
Welcome, aspiring designers, to this elite masterclass designed specifically for the latest NIFT Situation Test. The Situation Test is not merely an assessment of your model-making skills; it is a rigorous evaluation of your ability to translate a complex abstract concept into a three-dimensional narrative. Today, we are tackling a theme that sits at the very heart of Indian textile identity: Handloom Heritage. Your challenge is to design a conceptual ramp that doesn’t just display clothes, but embodies the rhythmic movement of a traditional wooden loom and the structural logic of warp and weft. To succeed, you must think like an architect, feel like a weaver, and execute like a master craftsman. This guide will walk you through the conceptual, technical, and narrative steps required to score a perfect 10 in this segment.
💡 Why is this topic significant?
NIFT often focuses on topics that bridge traditional Indian crafts with modern design thinking. The ‘loom’ represents the intersection of mechanics and art, making it a favorite for examiners to test your structural innovation.
The Panelist’s Perspective: Evaluation Criteria
As an elite panelist, when I look at your model, I am looking for more than just a sturdy structure. I am looking for Conceptual Translation. Did you just draw a loom, or did you extract its essence? Here are the five pillars of evaluation:
- Conceptual Clarity: How well have you integrated the ‘warp’ (vertical tension) and ‘weft’ (horizontal insertion) into the architectural layout?
- Rhythmic Movement: Does the model suggest motion? The loom is a machine of repetition. Your ramp should have a visual flow that mimics the beating of the reed and the flying of the shuttle.
- Material Manipulation: Can you make cardboard look like heavy timber? Can you make thread look like a sophisticated weave? The innovative use of the provided kit is paramount.
- Structural Integrity: The model must be neat, stable, and self-supporting. Visible glue marks or sagging structures are immediate red flags.
- The Narrative (Write-up): Your 100-word explanation must articulate the ‘Why’ behind your ‘What’.
“The best models don’t just occupy space; they tell a story of movement even when standing perfectly still.”
Decoding the Concept: Warp, Weft, and Rhythm
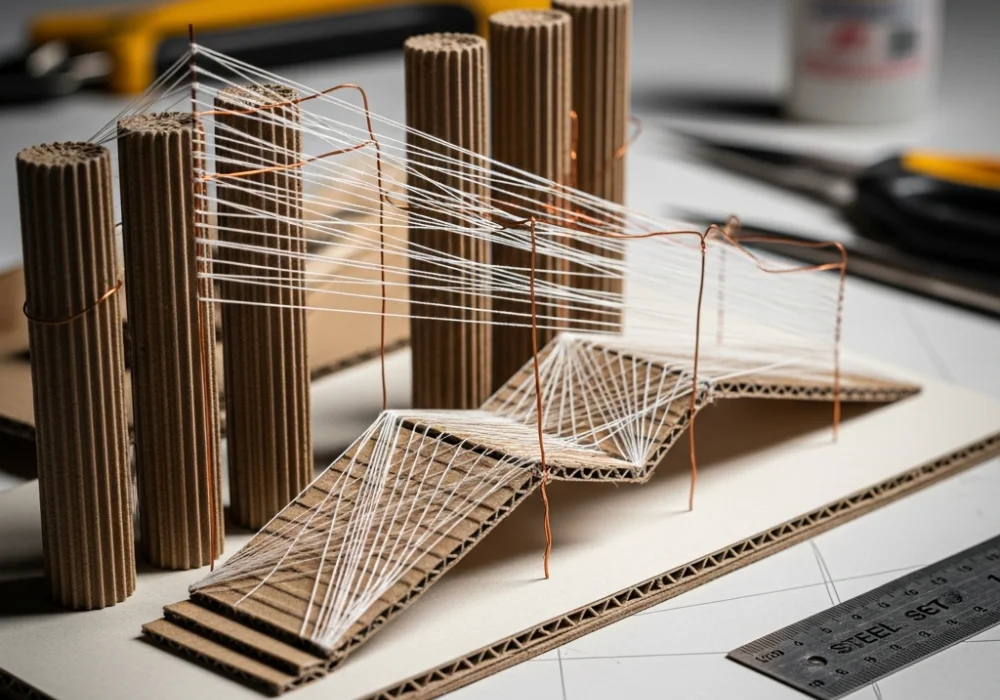
To design this ramp, you must understand the components of a loom. The Warp is the set of longitudinal threads held in tension. This can be represented by tall, vertical pillars or taut strings that form the backdrop or the supports of your ramp. The Weft is the transverse thread that weaves through the warp. In your model, this could be the actual pathway where the models walk, zig-zagging through the vertical structures.
The Rhythm is the most abstract part of the brief. Think of the ‘clack-clack’ of the wooden loom. This can be visualized through repetition and gradation. Use repeating elements that change slightly in height or angle to create a sense of mechanical movement. Imagine the ramp not as a flat surface, but as a series of levels that rise and fall like the heddles of a loom during the weaving process.
💡 Design Trick: The Moiré Effect
Overlap two layers of wire mesh or parallel threads at a slight angle. This creates a visual ‘shimmer’ that mimics the texture of hand-woven fabric, instantly impressing the jury with your attention to detail.
Material Handling Masterclass
In the Situation Test, your kit is limited. Here is how to handle materials for this specific ‘Handloom’ theme:
- Cardboard & Mount Board: Use these for the ‘wooden’ frame. To give it a wood-like texture, you can score the surface lightly with a cutter or peel off the top layer of corrugated cardboard to reveal the ‘ribs’ inside, which look like the reeds of a loom.
- Thread & Yarn: These are your heroes. Do not just stick them on. Create tension. Use them to create ‘webs’ between your cardboard pillars to represent the warp.
- Copper Wire: Use wire to create the ‘shuttle’ path. Its metallic sheen provides a beautiful contrast to the organic feel of the cardboard and thread.
- Transparent Sheets: Use these to create ‘floating’ platforms. It gives the ramp a modern, conceptual feel, making it look like the garments are floating through the weaving process.
- Glaze Paper: Use earthy tones (browns, creams, ochres) to reinforce the ‘Heritage’ aspect of the brief.
Step-by-Step Model Construction Strategy
Phase 1: The Foundation (15 Minutes)
Establish a solid base. Your base shouldn’t just be a flat square. Perhaps it’s a raised platform that mimics the floor of a weaver’s shed. Cut a large piece of mount board and create a slight ‘sunken’ area in the center where the main loom structure will sit. This creates depth immediately.
Phase 2: The Vertical Warp Pillars (30 Minutes)
Construct 4 to 6 tall, slender pillars using ivory board or rolled-up newspaper sticks. Place them in two parallel rows. These represent the loom’s frame. Connect them at the top with a horizontal beam. Pro-tip: Ensure these are perfectly vertical. A leaning pillar suggests poor craftsmanship.
Phase 3: Integrating the Rhythmic Path (45 Minutes)
Instead of a straight ramp, create a path that ‘interlaces’. Use strips of mount board to create a walkway that goes ‘over and under’ horizontal support beams. This is the visual representation of the weft. To show rhythm, make the walkway segments vary in height, creating a wave-like motion as the models move from the start of the ramp to the head.
Phase 4: Adding the ‘Fabric’ Texture (30 Minutes)
Using the thread provided, start ‘weaving’ between your vertical pillars. Do not try to weave a whole cloth; instead, create a ‘deconstructed’ weave. Let some threads hang loose to show the process. Use the copper wire to create a dynamic ‘loop’ that travels through the structure, representing the movement of the shuttle.
Phase 5: Refinement and Cleaning (20 Minutes)
Remove all glue ‘cobwebs’. Ensure the edges of your cardboard are smooth. If you have time, add a ‘human element’—a small, abstract wire-mesh figure at the start of the ramp to provide scale.
The Concept Note: How to Write to Win
Your model must be accompanied by a write-up. Here is a winning template for this topic:
Title: The Rhythmic Interlace
Concept: My design translates the mechanical precision and rhythmic soul of the traditional wooden loom into a contemporary fashion ramp. The vertical pillars represent the ‘Warp’ threads under tension, providing the structural backbone of the heritage show. The ramp itself is designed as a ‘Weft’ pathway, interlacing through the structure to symbolize the creation of fabric. The repetitive, undulating levels of the walkway mimic the rhythmic beat of the loom’s reed. By using exposed corrugated textures and raw thread-work, the model celebrates the ‘Handloom Heritage’ through a deconstructive architectural lens, merging the process of making with the act of showing.
Final Expert Pro-Tips
- Time Management: Spend no more than 20 minutes on ideation. The Situation Test is a race against time.
- Neatness: Use a ‘finger-painting’ approach with Fevicol—apply a thin layer. Excessive glue will warp the paper and look messy.
- Negative Space: Don’t crowd the model. Leave ‘air’ between your threads and pillars. Negative space is a design element that shows sophistication.
💡 Quick Quiz: Test Your Design Knowledge
Question: What is the most effective way to show ‘Heritage’ in a model using only white paper and cardboard?
Answer: Focus on texture and form. Use ‘aging’ techniques like scoring or tearing paper to create a weathered wood effect, and use traditional geometric patterns (like Ikat or Jamdani motifs) as cut-outs in your structure.
Take Your NIFT Preparation to the Next Level!
Struggling with material handling? Not sure if your concepts are strong enough? Don’t leave your dream to chance. Our experts at MyEntrance are here to help you master the Situation Test and Personal Interview rounds with personalized feedback and mock tests.
💬 Chat with our Experts on WhatsApp (+91 9526806124)