NID DAT Previous Year Questions Decoder: The Ultimate Guide to Reimagining Mundane Objects
Welcome, aspiring designers! If you are preparing for the NID DAT (National Institute of Design – Design Aptitude Test), you already know that the exam does not just test your sketching skills—it tests your ability to see the world through a lens of empathy and innovation. One of the most recurring themes in Previous Year Questions involves the deconstruction and reimagining of mundane household objects. Whether it is turning a bucket into a geriatric aid or a colander into a child’s toy, your ability to map design solutions to specific user personas is the key to a top-tier score.
The Core Philosophy: Beyond Aesthetics
In the NID DAT, an object is never just an object. It is a collection of functions, materials, and affordances. When a question asks you to redesign an item for a child or an elderly person, they are checking if you understand Anthropometrics (human body measurements) and Ergonomics (efficiency in the working environment). Children need sensory stimulation, safety, and scale-appropriate designs. The elderly require stability, high visibility, and ease of interaction to compensate for reduced dexterity or vision.
Breakdown of 5 Realistic Exam-Level Questions
Let’s dive into five simulated questions based on trends seen in Previous Year Questions to sharpen your design thinking.
Question 1: The Plastic Bucket Reimagined for the Elderly
The Task: Redesign a standard 20-liter plastic bathroom bucket to assist an elderly person with limited grip strength and back pain during a bath.
The Traditional Method
Most students will draw a bucket with a slightly larger handle or perhaps add a stool. They might focus on making the bucket look ‘prettier’ or more modern. This approach fails because it doesn’t address the primary pain point: the weight of the water and the effort required to tilt it.
The 30-Second Ninja Shortcut: The ‘Pivot & Pour’ Technique
Focus on Mechanical Advantage. Instead of lifting, think about pivoting. Draw a bucket that sits in a low-profile rocking frame. The user only needs to apply a tiny amount of pressure to the rim to tilt the bucket. Add a secondary ‘support handle’ at the bottom of the bucket for a two-handed grip. Use a contrasting color (like bright orange) for the rim to help those with failing eyesight identify the water level.
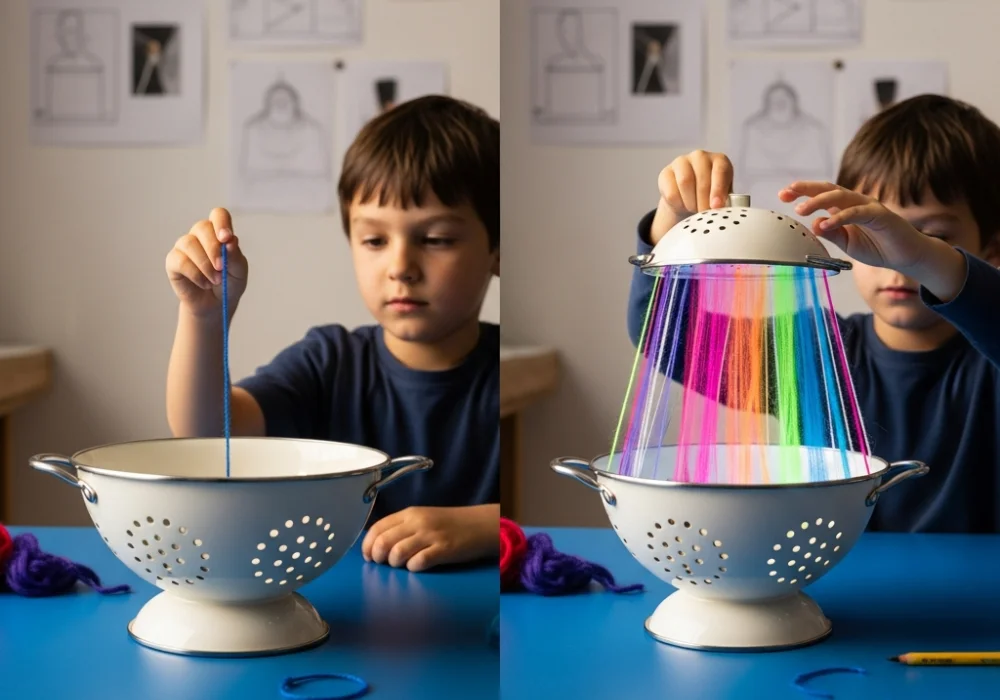
Question 2: The Kitchen Colander for a 5-Year-Old
The Task: Transform a stainless steel kitchen colander into an educational toy for a child aged 5, focusing on motor skills and creativity.
The Traditional Method
The standard response is to paint it with cartoons or use it as a helmet for ‘pretend play.’ While creative, it doesn’t utilize the inherent geometry of the object—the holes.
The 30-Second Ninja Shortcut: The ‘Function Fusion’ Technique
Reimagine the colander as a ‘Starry Night Weaver.’ The holes are the primary feature. Provide the child with colorful, thick wool strings or pipe cleaners. The colander becomes a 3D canvas for ‘threading art.’ This develops fine motor skills. Invert it, place a light source underneath, and it becomes a room projector. In your sketch, highlight the ‘Safety-Edge’ (silicone coating) to show you prioritized the child’s safety.
Question 3: The Clothes Hanger for Limited Hand Mobility
The Task: Modify a standard wire clothes hanger for a user who suffers from severe arthritis in their fingers.
The Traditional Method
Students often just make the wire thicker or add a foam grip. This still requires the user to ‘hook’ and ‘unhook’ the hanger from a high rod, which involves shoulder strain and precise finger control.
The 30-Second Ninja Shortcut: The ‘Magnetic Accessibility’ Technique
Eliminate the ‘Hook’ entirely. Replace the traditional top hook with a Heavy-Duty Magnetic Sphere or a large ‘C-Grip’ that can be slapped onto a metallic rod rather than precisely looped over it. For the body of the hanger, use a ‘Telescopic Frame’ that can be inserted into the garment while folded and then expanded, removing the need to stretch the fabric or struggle with necklines.
Question 4: The Old Television Cabinet for Toddlers
The Task: You have an old, bulky wooden TV cabinet (the kind with a hollow center). Re-engineer it into a multi-functional ‘Creative Hub’ for a toddler.
The Traditional Method
The most common answer is to turn it into a bookshelf or a storage box for toys. It is functional but lacks the ‘Design Surprise’ factor NID evaluators look for.
The 30-Second Ninja Shortcut: The ‘Scale Transformation’ Technique
Convert the TV cavity into a ‘Puppet Theater & Chalkboard.’ The front opening becomes the stage. The side panels are coated in chalkboard paint for vertical drawing (great for gross motor development). The bottom area is converted into a ‘crawl-in den’ lined with cushions. This utilizes the ‘Enclosure’ instinct children have, making it a safe space for reading.
Question 5: The Manual Alarm Clock for Senior Citizens
The Task: Redesign a classic twin-bell alarm clock to be more user-friendly for a person with hearing loss and cataracts.
The Traditional Method
Simply making the numbers larger or the bells louder. This can be counter-productive as loud noises can be startling and distressing for the elderly.
The 30-Second Ninja Shortcut: The ‘Multisensory Feedback’ Technique
Introduce Haptic and Visual Cues. Replace the bells with a ‘Glow-Ring’ that mimics sunrise, gradually increasing in brightness. Add a ‘Vibrating Puck’ connected by a cord that can be placed under the pillow. For the interface, use ‘Tactile Markers’ (raised bumps) at the 12, 3, 6, and 9 positions so the time can be felt in the dark without needing to see the numbers clearly.
Mastering the Design Thinking Process
When solving these Previous Year Questions, always follow this three-step mental framework:
- Deconstruct: List the physical properties of the object (Weight, Texture, Parts, Holes, Transparency).
- Empathize: List the limitations of your persona (Vision, Grip, Height, Cognitive Load).
- Reimagine: Match a property to a limitation. (e.g., Use the ‘Holes’ of the colander to solve the ‘Boredom’ of the child).
Cheat Sheet: Quick Revision Formulas
Use this table to quickly reference design strategies during your practice sessions.
| Target Persona | Key Pain Points | Design Solution Strategy |
|---|---|---|
| Children (3-7 years) | Small hands, safety risks, short attention span. | Rounded edges, bright primary colors, tactile feedback, gamification. |
| Elderly (65+ years) | Arthritis, low vision, balance issues, memory. | Large handles (D-shape), high-contrast labels, anti-slip textures, simplified UI. |
| People with Disabilities | Limited mobility, sensory barriers. | Hands-free operation, magnetic attachments, audio-visual-haptic redundancy. |
| Mundane Objects | Fixed function, boring aesthetics. | Deconstruct into basic shapes; find secondary functions for every part. |
Pro-Tip for the Exam Day
In your sketches, always include a ‘Human Element.’ Don’t just draw the object. Draw a hand interacting with it or a small stick figure using it. This proves to the examiner that you have considered Scale and Context. Label your drawings clearly with ‘Design Callouts’—short notes explaining why you made a specific choice.
Ready to Crack the NID DAT?
Design is not just about drawing; it is about solving problems. Keep practicing with Previous Year Questions and keep observing the world around you. Every object you see is an opportunity for a better design!
💬 Chat with our Experts on WhatsApp (+91 9526806124)